Showing posts with label denver house. Show all posts

Thursday, August 19, 2010

Summer update

It didn't seem like much was getting done but I was wrong.

In July I took a 2 day class on straw bale construction. It was by the same teacher that taught the natural finishes class and although she has a lot of experience and is good with sharing it I was much happier about the hands on the other class had. The class used to be 3 day and losing a day was noticed. We did get to tour some pretty cool houses in various stages of construction.


Then the last of the siding was fixed. It doesn't look like much here but it is a vast improvement. Now the house can be painted. There was also an issue with the gutter that was leaking water back behind the soffit. I'm pretty sure the cause has been located and some flashing should fix the issue.


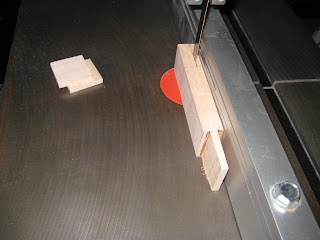
There is a curve in the transition between the kitchen tile and living room floor. This means that there is no way to buy a transition strip. The first thing that had to be done was that I had to make a decent router table. The straight pieces were pretty easy and although I've got to redo one that is too short they are essentially ready for varnish. The curved piece is a whole nother story. Probably should be it's own post once it is complete.


Some fun was had too. Got to go on two hikes so far this year. I'm looking forward to the kid getting old enough to come along. Next year or the year after?

Wednesday, June 16, 2010

The end of blah

It has been close to two months since I posted anything. An extended illness and spring business have contributed but mainly nothing has been finished enough to take a picture. That and I just didn't care. But now I care and respond with more than just 'meh' to the overwhelming list of things to do.

I did most of the wiring in the garage. There are shop lights and outlets hanging from the ceiling now. The outlet thing is a great idea that I got from way back in high school shop class. Yes, I've been waiting nearly twenty years to hang an outlet from the ceiling. Also finished the drywall in a corner of the garage and was able to put up a work bench and hang a bunch of cabinets in the corner. The garage is organized unlike it ever has been now. It was so inspiring that I started to make more cabinet doors for the kitchen. A race has started, will my son start crawling or will I get doors on the lower cabinets first? Right now it is looking like he is winning the race.

The garden has a bunch of tomatoes taking off, some peppers too. My initial planting bug got side tracked by illness so a number of veggies haven't been started or were just planted in the last week. The pea harvest promises to be disappointing this year. Going out and eating peas right off the plant was the highlight of the garden last year and I'll miss it this year.

The chickens seem happy. I've got a gross story to tell so if you have a weak stomach skip to the next paragraph. My compost turner was overly wet and the green to brown ratio was way off on the green side and well it stank, a lot, I'm surprised the neighbors didn't call the police kind of stink. So While trying to fix the compost turner (hint: drill drain holes in the bottom!) I was using a 5 gallon bucket that got infested with fly larvae. My first response was to drop the lid and promptly go back inside. After some refection I braced myself with the knowledge that maggots only like rotting flesh and that the chickens would like a tasty treat. Next came a lengthy process of scooping out maggots and rinsing them to reduce the chance of the girls getting botulism. The chickens LOVED the maggots. Every time I walk out the back door now the chickens jump up and run over to the end their run and make a hooting/honking noise.
It kind of made it worth the grossness. I fed them the larvae a couple more times but now there are no more maggots. I've started doing research and found that people harvest Black Soldier Fly larvae for their chickens and that there are plans for building harvesters and people that will send a batch of larvae in the mail. More to come as experiments progress...

http://blacksoldierflyblog.com/


The half bath has all of it's drywall up and the plumbing for the vanity sink has been installed. Just one last light finish coat of mud and a light sanding will be it before breaking out the texture gun again.

There was also an earth plaster experiment in garden that was a partial success but the three days of rain that occurred before I got to put the lime coating on negatived a lot of the work. This will eventually get it's own post.

And lastly the exciting part. The list!

Addition
o Find a heater option
o Raise bedroom wall
o Replace windows
o Rewire lights
o Check sub-floor
o Replace siding
o Backdoor, sliding?
o Walls, more drywall!!

House
o Sidewalk, mud jack?
o Paint outside
o Addition gutters
o Spread driveway gravel

Crawl space
o Seal vent cracks
o Insulate between floor joists
o Spray fungicide

House - inside
o Cabinet doors
o Grout fireplace
o Make floor transitions
o Paint floor trim

Bathroom - Half bath
o Install new vanity
o Light fixture
o Drywall
o Power; GFCI outlet and light
o Tile floor
o Re-seat toilet

Garage & yard
o Wiring
o Insulation, walls and attic
o Attic vents
o Drywall
o Build room in garage
o Stone paths
o Put up side fence & gate
o Trim branches on neighbor's tree
o Repair back fence

Tuesday, April 13, 2010

Coop


The chicken coop is finally done. I still need to figure out a nesting box but I've a couple of months to work that out. They have a double pane window and insulation and it might be more sturdy than my house. Over engineered is the term that comes to mind. Moving it from the garage to the chicken run and up on the concrete blocks was an exercise in pyrmid technology. Levers and rollers and rope and such. The cement blocks are ugly and I've got a half baked idea on how to make em look better. One thing that was of concern was how to connect the chicken wire so that no animals could get in for a snack. The hardware cloth happened to be wrapped in wire and I was able to use the wire to sew the chicken wire together. It seemed pretty slick at the time, maybe I was out in the sun to long.

This site is a calculator for overhangs. Put in your latitude plus the hieght and width of the over hang and it will tell you what percent of the sun the overhang will block broken down by month.

http://susdesign.com/overhang_annual/index.php


With the chickens taken care of some attention can be paid to the house again. My dad was over earlier in the week and we spent half a day in the crawl space fixing wiring and getting plumbing ready for the half bath. About 4 more hours of crawl space fun and we should be done down there for good.

Spring also brings chores for the garden. Planted a bunch of tomato and peas and the seedlings are doing good. Everything else is going to get to grow in situ this year. Next year they will have a sun room and I'll be able to set out more than two trays.

Thursday, December 10, 2009

Drawer front and door how to.

I wanted to do this all in one piece but the garage is frozen and it will be a while before work can continue. The following covers the building of 4 drawer fronts.

First the wood needs to be cut to length.


Next is putting the horizontal pieces (rails) through a dado blade to produce a cut that is as deep as the vertical pieces (stiles) are wide and 1/3 the thickness of the boards. The jig I made to help keep my hand away from the blade is blocking some of the view. This creates the mortise.


Then the rough tenon is created with a bandsaw. Bandsaws don't have the cleanest cuts so a little chisel work and sanding is needed. This could also be done on the tablesaw but I like having both set up and not switching back and forth.


After some sanding fit all of the pieces together and mark where the center of the corner is. Drill 1/4" holes (it hasn't been done yet in the picture) where the lines cross at the end of the mortise pieces. Then put in the tenon piece and mark the center on the tenon. Make a second mark about 1/16" or even less away from the end. Drill on the second mark. This will cause the 2 pieces to be sucked tight when the hole is pegged. Because of this trick I made the first several without any glue.


I'm tried something new with this set and used a plug cutter to make the plug. Before I was making dowels out of small pieces of walnut and that was just plain tedious.


Next will be the glue up, routering the back for the panel and putting in a panel. Last will be stain and varnish.

Monday, November 2, 2009

Tuesday, October 27, 2009

floors and trim


The floor is done. The trim would have been done if I didn't keep cutting in the wrong direction. All that is left is some touch up paint, the transition strips and grouting the tile around the fireplace.

Thursday, October 22, 2009

Floortastic


The GFs (soon to be BM) brother used to have a job installing floors so he stopped by to help. It took a lot of the worry off having more than a wild ass guess in answer to issues that came up. The only floor I had installed before was a small room that was pretty square and I didn't really care that much about how it turned out. Unfortunately the floor stapler had to be returned before the job was done. It is surprisingly cheap to rent though so it isn't a big deal to get a stapler for half a day next weekend. The tile around the fireplace got finished as well, only have the grout left. I'm thinking about using all that cool stuff I learned in the natural finishes class and making a mortar out of clay and sand. More on that later.

Thursday, October 15, 2009

Oh the anticipation


Hiding behind a new coat of mud is the worst drywall job I have ever done, even ever seen. Knowing that it will be covered with tile and hating drywall the way I do there was just no way to muster anything resembling craftmanship. It's pretty amazing what drywall mud can cover though. I might stop trying all together when hanging drywall. If I've been livin' right the new floors will be in on Monday and I'll be able to start and maybe finish that next week. A little more tile work, the floor, some trim and buying a couch is all that remains between me and a day off guilt free laying on a couch reading. It is getting chilly out so a cup of tea and a fire in the background might be put in that picture. Last week the inspector gave the okay on the new fireplace and he didn't even mention that the rest of my house looks like a construction zone. Glad that bit of stress has passed. The fireplace works great and it doesn't take much wood to keep the front of the house toasty. The thermostat is a little to close to the front so the rest of the house stays pretty chilly unfortunately. Clearing out some of the scrap wood that I've been saving for the fireplace has already made some room in the workshop. All this effort and we are talking about moving with the kid on the way and all. Maybe the school district will turn out better than it seems on the outside.

Wednesday, September 30, 2009

All of a sudden


Last week I put tile on the hearth and the paint elfs (my parents) stopped by to help with the living room. Once the inspector gives the okay for the fireplace the wall around it can be finished with tile and all that will be left is the floors. Well, and the door trim, and the french door needs some work, and the cabinet doors are still in progress, and the breakfast bar hasn't been started. Well it looks a lot closer to being done anyway. Put the order in for the maple floor today. The day of having a living room is near.

Tuesday, September 15, 2009

Other peoples work.


It doesn't look like anything to brag about. The new fireplace was installed yesterday. That means that the wall can finally be finished. In the upper left corner there is some paint visible from where the south wall and part of the west wall was textured and painted last weekend. The fridge got moved into the kitchen in the process. Now that is something to celebrate. Before I can use the fireplace and inspector needs to come and sign off on it. The next project will be to build a hearth and clean up for the inspector. Hopefully I'll be buying hardwood floors by the end of the month.

Tuesday, September 1, 2009

Grout


The thing about grout is that once you start there is no stopping. Even two hours into it when you don't think that you can hold your arm up anymore there is no break because there is a time limit. Once the grout hardens it better be where you want it to be. I tried something new, it was a sealer that got added to the grout instead of water. It had very specific instructions on not adding more liquid but the bottle didn't have enough liquid for the grout mix. The thicker grout is mixed the more difficult it is to get it in the gaps between the tiles. All that is past now and there are only a few minor problems that will get fixed by the matching caulk that came with it.

Thursday, August 27, 2009

Wood stain


There are a number of finishing pieces of wood that will be ready to install in the kitchen next week. This one will cap the island wall. It was a shame to stain this piece of wood, it was so beautiful. The wavy cross lines are still visible but they don't glow anymore. If it was up to me all of the wood would be just sanded and varnished. Sundays goal is to grout the tile and by Tuesday I'm hoping to have 4 more drawers in. Wish me luck.

Wednesday, August 19, 2009

Drawers


There is even silverware in them! 8 more drawers and 12 cabinet doors to go. But it feels good to have something look done. The counter backsplace can be seen in the picture too. There is just a couple feet of tile left behind the stove and the grouting can be done. Then it'll be like a kitchen, a kitchen with no cabinet doors.

Thursday, August 6, 2009

Sunday, August 2, 2009

Sans picture window


After two days of work the old 8'x5' picture window is gone and a 6'x4' window is in it's place. I think the new window looks more inline with the style of the house. Not that you can see that in the rather utilitarian pictures. The trim needs some touch up paint (and the house needs painting) but the outside is basically done. The inside only has the first coat of drywall mud though. The only major living room construction left is the fireplace. The a wall of drywall and tile grouting. Then the wood floors and presto, a living room slash kitchen. It has only taken 11 months to get to this point...

Thursday, July 30, 2009

Cabinet and tile progress.


In my typical style a little of everything has been worked on with nothing finished. Some of the face frames have been stained, varnished and installed. It is hard to tell be the cabinet on the right has a face frame. The tile back splash design was finally decided on and almost half of the tile has been laid. The kitchen might actually be done by the end of August, yay! The big project for Saturday is to replace the 8'x5' living room window.

Tuesday, July 14, 2009

Completely lazy


Well, not really but it feels that way without the kitchen looking much different. Started staining the face frames for the cabinets but I'm not at all happy with the results. Here is a picture of the pea harvest instead. It is the third such harvest and zucchini have been harvested as well. Beans will be ready soon too. Nothing else exciting from the garden for a couple of weeks. The lack of visible kitchen progress prompted me to do some tiling on the island, that's what is under the peas. Now I'm off to lament the poor staining job.

Monday, June 29, 2009

An oven


Dinner last night was made with two, yes TWO, burners! The hot plate has been retired. Time for some tiling. The face frames are about ready for staining, just a little more work to strip the first attempt.

Sunday, June 14, 2009

phase 2


It's an island! Some day there will be an oven and a breakfast bar too.

Wednesday, June 3, 2009

Cutting tile and cutting corners

The kitchen came with some decent tile. It's one of the few things in the house that was not torn out at some point. When planning the new kitchen configuration I just assumed that I'd be cutting through the tile for the island wall floor plate. Cutting through tile turned out to be not that easy and it made a toxic awful smell. Seriously, I think my life has been shortened. And so enters the cut corner. I found where the floor joists were and drilled through the tile so that the floor plate can be lag bolted to the joists. A previous owner put the tile under the old counters so I put the new counters on the tile too. I feel sorry for anyone that will try to take out that tile.